
“Not enough USB Charge Ports”. If you’re like me and driving a preUSB truck, setting up USB charging is a pain. With only one auxiliary 12 volt socket in the Toyota FJ Cruiser two USB sockets was the limit and for that I had to give up the aux port. I also had a tendency to go through the USB charge plugs due to their lack of durability. Well, I finally had enough and it was time to remedy the situation.
Blue Sea Systems USB Socket
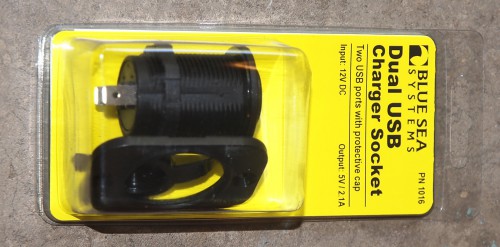
I purchased two Blue Sea, marine grade, Dual USB Charger Sockets. These sockets provide a typical 2.1amp total for the USB devices. The Blue Sea part number is 1016 and can be purchased from multiple sites on the net. These charge sockets are heavy duty with a nice rubber cap that will keep dust out when not in use.

Dash Location
For my installation I wanted the sockets to be switched. Position 1 will be constant on, position 2 is off and position 3 is switched. This allows me to control the parasitic current draw as well as when any attached devices will be powered. The switch for this is a SPDT on-off-on switch from radio shack.

Wiring harness
For the installation I built a simple wiring harness that passes through the firewall to my custom auxiliary battery system. The harness is attached to both the switched and unswitched side of the system and is protected by two 5 amp fuses.

Hole cut in dash
I used a 1″ hole saw to cut the hole in the dash then a dremel sanding disk to open up the top part of the hole to accommodate the flat side of the adapter which keeps it from spinning in the dash. There is an included screw plate that can be used to keep the socket from spinning if you want to go with a 1.25″ hole. I drilled a second hole close by each charge socket for the toggle switch that will control the power.

Completed installation
The spot I chose in the FJ Cruiser is the flat dash panel in front of the passenger that has easy access to the back side when the glove box is removed. The rest of the installation went without a hitch. The threaded ring holds the adapters firmly in place and the post on the switch was just long enough to fit through the plastic in the dash.

Port in use in unswitched power mode. WIll still power device when all systems are shut down in the FJ.
I pulled the wired through the rubber firewall grommet using a coat hanger. The coat hanger punches easily through the rubber. I then taped the wires to the end and pulled them back through. With the fuzes installed and all wiring termination complete the USB charge sockets functioned flawlessly. Now to see how long these USB charge sockets last.
